Inhaltsverzeichnis
Nvidia RTX and recording settings
Introduction
This guide helps beginners to set up gameplay recording correctly on Nvidia graphics cards. We show you where to find the options in the GeForce Experience overlay and how to configure them for best results – for both GeForce and RTX cards.
//
Please bear in mind, however, that this is merely a recommendation and may vary depending on your hardware.//
Open the GeForce Experience Overlay
- Make sure GeForce Experience is installed.
- Press the hotkey combination Alt + Z [1].
- The overlay appears as a small menu at the top of the screen.
Start continuous recording ( “POV” )
- In the overlay menu, select Record > Start/Stop Recording [2].
- Start or stop recording manually.
- Please note that you must adjust the recording settings beforehand
Enable Instant Replay ( "Clip / Video Evidence " )
- Click Switch on
- Under Instant Replay settings:
- Duration: Select how many minutes to save
- Video quality: Low, Medium, High, Custom
- Resolution: 720p (1280×720)
- Bitrate: 7–10 Mbit/s
- Hotkey: By default Alt + F10 [4].
Adjust video and audio settings
1. Open the overlay (Alt + Z[1]) > Recording > Recording quality 2. Options:
- Resolution: 1280×720
2. The following actions can be customised here:
- Start/stop recording
- Save instant replay
- Take a screenshot
- Start/stop broadcast
Recording location
1. Open overlay (Alt + Z) > Recording > Recording location 2. Default path: `%USERPROFILE%\Videos` [7]. 3. The save location can be changed as required.
Tips for beginners
* Higher FPS or bitrate result in larger files [5] * NVENC reduces CPU load compared to software encoding * Instant Replay requires sufficient free memory * RTX cards can utilise AI features to enhance video quality whilst maintaining the same performance
Footnotes
Recommended settings
Here is a recommendation based on recent experience:
- Settings:
- Resolution: 720p (1280×720)
- Frame rate: 60–120 FPS

- Nvidia GeForce [3]

Audio issues
Nvidia audio recording settings
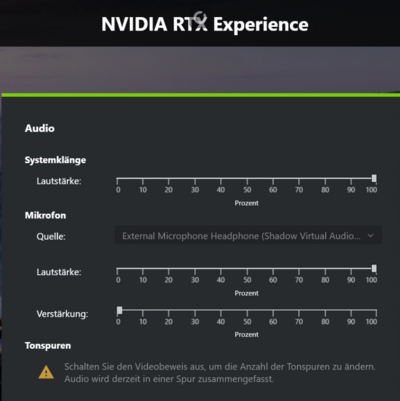
Nvidia also offers the option to record audio and use your microphone. However, this must be configured separately. In Grand-RP, for example, what your ears and eyes normally hear and see must also be visible and audible in the video. If you can’t be heard, it may be because either the microphone has been disabled in the settings or Nvidia is experiencing one of its well-known audio bugs again. We’ll go into more detail on this shortly.
Overview of audio settings
* Please note that Nvidia manages its own microphone, and you must select the correct one.
Audio bug issues / people can’t hear me, no sound audible
There is, or rather was, an audio bug which, following a driver update, adjusted the settings in such a way that you could no longer hear anything, or could only hear yourself – or, conversely, couldn’t hear yourself at all.
To fix this, the sliders in the audio settings must be set all the way to 0 and then back to 100.
Note that for the ‘Gain’ slider, the audio volume must be set to 100 in order to adjust it from 0 to 100 and back to 0.
*